Thursday, November 5, 2009

kuri kinton

Photobucket

Kinton
is one of the easiest to make among Japanese confections, and Kuri Kinton (Chestnut Kinton) is probably the most traditional among the many kinds you can make. The most common version involves mixing pureed sweet potato (satsuma-imo) with whole or crumbled chestnuts-bottled-in-syrup-- a spoon-able version that often appears as part of O-sechi ryouri (New Year's cuisine arranged prettily in fancy lacquered boxes). I find that version a bit too sweet, and lacking in visual appeal. For many years I was convinced I didn't like kinton confections at all. But then I discovered the molded kuri kinton made by a number of wagashi artisans. The recipe posted here was inspired by one of my favorites, a kuri kinton made by Seigetsudou Honpo, a confectionery of Gifu prefecture.

Ingredients for 5~7 confections:
boiled or roasted chestnuts, peeled..........240 grams/8 oz
mizu ame (rice syrup) or corn syrup.......just enough to moisten the chestnuts

Set aside one or two chestnuts, and mash the rest to a pulp. Mix in rice syrup, a tiny bit at a time, until the mashed chestnuts are just moist enough to stick together when you squeeze a clump of it in your hand. If it is not sweet enough for you, add some sugar until it is. Chop the chestnuts that were set aside--finely, but not so fine that you don't notice them when you bite into the confection. Mixed the chopped chestnuts into the mashed moistened chestnuts. Divide the mixture into 5~7 portions and twist each portion in a square of plastic wrap so it gets shaped into a ball marked with wrinkles from the wrap. When each ball is firmly shaped, press gently down from the top to flatten it a little. Unwrap the confections just before serving. Delicious with hot green tea or houji-cha.

Photobucket

If chestnuts-bottled-in-syrup is all you can get, go ahead and use it. The chestnuts will be easier to mash, and you probably won't have to add any further sweetener.

Tuesday, October 27, 2009

ginkgo nut pastry nuggets

ginnan10(L)

In Sapporo, it's now the season when ginkgo nuts start dropping from the maidenhair trees. I racked my brains to think of a tea-time treat that could be made from this seasonal delight. We think of wagashi, of course, as a sweet thing. But not all Japanese tea-time treats are sweet. We munch on sembei rice crackers of all kinds as an accompaniment to tea, and one of my favorite snacks is a brick of mochi grilled till it's crackly outside and melty inside, then served with a mixture of soy sauce and grated daikon radish. Mmmm, delicious! Ginkgo nuts strike me as best suited to a savory snack.

ginnan(L)

Ginkgo nuts.... although used frequently enough in Asian cuisine, they usually seem relegated to a minor role, and I have read that it isn't a good idea to eat too many of them at one time. So...how to make them the star of a dish without using too many at one time? I decided to adjust a recipe I have often used with olives.

Ingredients for 30 snacks:
Cheese, 1 cup (I had Gouda on hand, so that's what I used), finely chopped
Butter, 1/4 cup softened
Flour, 3/4 cup sifted
Paprika, 1/2 teaspoon
Oyster sauce, 1 teaspoon,
Hot pepper sauce, a dash
Black sesame seeds, 2 tablespoons
30 ginkgo nuts

The best ginkgo nuts are freshly gathered. If you are lucky enough to get these, you'll need to know how to prep them for this recipe. I hate the water-logged texture of canned ginkgo nuts, but the procedure of extracting the nuts from their smelly yucky inedible fruit exterior has always put me off prepping them from scratch. This time, however, a friend did the yucky work, and presented me with a bagful of cleaned up and sun-dried ginkgo nuts in the shell.

Use pliers to crack open the hard exterior of the nuts. It may take a few tries before you figure out how to use just enough force to crack open the shell without smashing the nut inside. Don't worry about any papery skins remaining on them. Next, roll the shelled nuts around in a hot wok with a tiny bit of oil. The nuts will take on a beautiful jade green color. After you take them off the stove, you'll see how easy it now is to slip the papery skins off. Sprinkle them with salt and let them cool.

ginnan2(M)

ginnnan1(M)

ginnan3(M)

ginnan4(M)

ginnan5(L)

Next, work the chopped cheese, softened butter, flour, paprika, oyster sauce, and hot pepper sauce into a pastry-type dough with your fingers, trying to get everything to bind together without overworking the dough. The dough will look dry and crumbly when you're finished, but if you take some in your hand and squeeze gently, it should stick together firmly. Take a bit of the dough, press it into a one-inch-sized ball, then flattened it on your palm. Place one nut in the center of this flattened dough, and then wrap the dough around it to reform a ball. Do this with all the dough and ginkgo nuts until they are used up (about 30 balls). Then gently press the balls into some sesame seeds. Lay the balls an inch apart on an UNgreased cookie sheet, and bake them in a 200 C (400F) degree oven for 15 minutes.

ginnan6(M)

ginnan7(M)

ginnan8(M)

ginnan9(L)


Baked pastry nuggets freeze very well.

Tuesday, October 6, 2009

miniature kabocha confections (nerikiri series)


The nerikiri dough (rice flour and white bean an combo) is as easy to use as playdough. A lot of people have been telling me it reminds them of marzipan, which I've never tried. And I don't know if marzipan can be made with a main ingredient other than almonds, but I do know that neriki can be made with alternate ingredients. In today's recipe, I substituted pureed kabocha (Japanese pumpkin) for the white bean an, wrapped the resulting nerikiri around a core of red bean an, and molded it to look like a miniature kabocha.

Ingredients for ten confections:

kabocha (or pumpkin)..... enough to result in 300 grams/ 10 oz of puree
shiratama-ko (glutinous rice flour)....2 teaspoons
sugar (optional)......30 grams/ 1 oz
matcha (powdered green tea).... 1 Tablespoon
tsubuan (coarse red bean an).....150 grams/ 5 oz
black or white sesame seeds for decoration (optional)....20~ 30
pine nuts or sunflower seeds for decoration (optional)....10

I cut one medium-sized kabocha into chunks and microwaved the chunks (loosely covered with plastic wrap) till the orange flesh was tender. When the chunks had cooled enough to handle, I cut away the hard green peel from the orange flesh, and mashed the flesh with a fork till it was a smooth paste. You can do this in a food processor if you prefer. I didn't add any sugar because I thought the kabocha was sweet enough. But if you like it sweeter, add sugar as you mash the kabocha.

pumpkinnerikiri2

Dissolve the shiratama-ko (rice flour) in a tablespoon of water, and mix it thoroughly into the kabocha puree. Click here for detailed directions (with photos) for making nerikiri. When the kabocha neriki is the right consistency and cooled to room temp, divide the dough in half. Take one of the halves and knead matcha (green tea) powder into it. This will color the dough green and add a wonderful green tea fragrance.

pumpkinnerikiri3

Roll the tsubuan (red bean an) into ten balls. Roll the orange half of the nerikiri dough into about 15 balls, and the green half into about 15 balls.

pumpkinnerikiri4

Once again, click here to see photos of how to put three nerikiri balls together in your palm and press them together to form a flat circle large enough to enclose one of the tsubuan balls. Only this time, combine the orange and green so that any one confection will be mostly green (with a dash of orange), or mostly orange (with a dash of green). Pinch pieces off the balls to adjust the amount of color you are aiming for.

pumpkinnerikiri5

Make sure the seams are smooth and the separate pieces of dough are sticking well to each other. Then press gently down on the top so that each ball is slightly squashed. Use the dull edge of a straight utensil (I used chopsticks) to press dents into the flattened balls to make them look more like real kabocha. I used sesame seeds to express the imperfections in the outer skin of the kabocha, and a sunflower seed to represent the stem.

pumpkinnerikiri1

Saturday, October 3, 2009

O-hagi (plus an explanation of "an")


A Dictionary of Japanese Food by Richard Hosking describes O-hagi as an "inside-out rice cake, so called because the an normally inside the cake is on the outside. The cake is named after hagi (bush clover), which flowers in the autumn and which the cake vaguely resembles. When these cakes are made in spring, they are called Botan mochi (peony cakes). They are made with a mixture of glutinous and non-glutinous rice and are coated with tsubuan... Simple, very popular, and very good."

I often think of Ohagi as an inside-out daifuku, which I guess is what Hosking means by "rice cake.". I introduced daifuku in my blog on Ichigo-Daifuku (Strawberry Daifuku), in which a fresh strawberry and red bean an were wrapped in mochi. An is a paste that can be made from various starchy ingredients and sugar, but the most common ingredient is azuki beans, which are reddish. Red bean an comes in various degrees of coarseness. The tsubu-an mentioned in the quote above is a coarse an which includes pieces of the bean skin. Koshi-an is smooth an where the skins have been sieved out. Shiro-an is made from white kidney beans. An can also be made from sweet potatoes, chestnuts, and lily roots, among other things.

Today I made kabocha (Japanese pumpkin) an to slather over my ohagi. I use a short-cut method to make the mochi center, by following the directions in the aforementioned Strawberry Daifuku blog. You may, of course, prepare a mixture of glutinous mochi rice and non-glutinous rice from scratch, but you won't find directions here for that (sorry).

To make the pumpkin an, I cut up a Japanese pumpkin (kabocha) and cooked it in my microwave until it was soft. I scraped the orange flesh off the tough green outer peel, and mashed it with a fork. Use a food processor if you like. Kabocha are naturally sweet, but if you want it sweeter-- or if you use a pumpkin that isn't quite as sweet-- add sugar to taste as you mash it.

Make oblong rolls of mochi (made sufficiently soft by following the directions in the daifuku blog) and coat with with the pumpkin an. I made a few of the traditional ohagi covered in coarse red bean an, a few with the pumpkin an, and placed one of each on a dish for contrast.

Photobucket

Friday, October 2, 2009

camellia blossoms (nerikiri series)


In my previous post, I explained how to make nerikiri, a combination of sweet white bean paste (shiro-an) and rice flour (shiratamako) that is the basis for a whole category of traditional Japanese sweets. Once you get the hang of neriki, this camellia blossom wagashi is a cinch to make.

Ingredients for 10 confections:

nerikiri dough from previous post, (about 300 grams/ 10 oz)
food coloring (red, yellow)

1. Divide 90 grams (3 oz) of the nerikiri into ten equal pieces. Roll each piece into an oblong ball.
2. Color 150 grams (5 oz) of the nerikiri red, and divide it into 50 equal parts.
3. Color the remaining nerikiri yellow, and divide it into 10 equal parts.
4. Flatten each yellow piece into a roughly rectangular shape (1.5 cm x 4.0 cm) and make little cuts along the top of the long edge with a knife. Wrap each one around a rolled piece of uncolored nerikiri.
5. Shape each piece of red nerikiri into a thin flower petal (wider at one end than the other), and place five petals evenly around the sides of each of the white and yellow centers you made in #4.

Photobucket

Photobucket

Photobucket

Serve with hot green tea.

Wednesday, September 23, 2009

fall leaves (nerikiri series)


I started my wagashi adventures with the easier confections that women of my parents' generation, and to a lesser degree my own, made for their families at home. Nowadays these confections are readily available at any market or roadside stall, so today's busy young mothers are less inclined to make them from scratch. I meant to prove to myself, and to my readers, that these confections can be made easily, cheaply, and quickly, and that they are so much better for you and your kids than the pre-packaged, mass-produced junk we would eat otherwise.

Before long I was ready to try something a bit more challenging, and I decided to take a swing at Nerikiri, which is the basis for a whole wonderful world of delicately-shaped and subtly-colored confections. The basic ingredients are the familiar ones from earlier posts.

Nerikiri ingredients:
White bean an........ 300 grams (10 oz)
Shiratamako........5 grams (about 2 teaspoons)
Water.......1 tablespoon

FallLeavesNerikiri2

Place the shiratamako in a small bowl with the water, and stir till the rice flour is completely dissolved. Add the white bean an to the dissolved shiratamako and mix thoroughly. Divide the an mixture into 6~8 equal portions and lay, without overlapping, in a ring around the outer edge of a round microwave-safe dish (I used a pyrex pie dish).

Leave the dish uncovered, and nuke in microwave for 3 minutes so that the excess moisture will evaporate out of the an mixture. Depending on the power of your microwave, you may have to repeat this two or three times. I ended up microwaving at 500W for a total of 7 minutes before the mixture was dehydrated enough (you want to be able to knead it like playdough).

Take the an mixture out of the microwave and scrape the separate portions into one lump and knead together so that it becomes a smooth ball of dough. Cover this with a damp kitchen towel and let sit until cooled to room temperature.

FallLeavesNerikiri1

FallLeavesNerikiri3

FallLeavesNerikiri4

Directions for Fall Leaves confection:
An dough from recipe above
Red Bean an..... enough to make 6~8 1-inch sized balls
Food dye

Divide the cooled nerikiri dough into three lumps roughly equal in size. Using food dye, color one lump green, another one yellow or orange, and the last one red or pink. I used powdered dye and dissolved the tiniest amount (1/8 teaspoon) with a drop or two of water before kneading the an dough into it. To make the orange color, I mixed yellow and red dye together before kneading the dough into it.

If the an dough gets too moist during this process, put it back into the microwave for a couple of minutes to dry it out enough to handle like playdough. Make 6~8 small balls from each color of dough. Place one ball of each color together (as shown below) and gently squeeze them so that they stick together. Place this on the palm of your hand and stretch it out without letting the colors mix up too much. Put a ball of red bean an in the middle and gently pull the colored dough around it till it is wrapped completely. Place this large dough ball in the center of a square of plastic wrap and twist the corners firmly at the top. (Traditionally, this is done with a thin cotton cloth.)

FallLeavesNerikiri5

FallLeavesNerikiri6

FallLeavesNerikiri7

FallLeavesNerikiri9

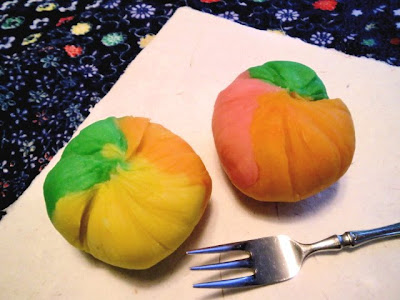
Let the confection settle for a while in a cool place (refrigerator would be good). When ready to serve, gently remove the plastic wrap so that the wrinkles formed in the confection are not disturbed. The idea is to evoke autumn by reproducing the tints of fall leaves. Experiment with different color intensities and combinations to suit your taste. I made some with just green and yellow dough, and others with just orange and red.

If you prefer a subtler color combination than shown here, experiment with dye products and techniques and you see what you can come up with. I will be posting several more in the nerikiri series of Japanese confections. The one shown here is one of the very simplest of these, but they can become quite fancy. Once you get the hang of nerikiri, there's so much you can do with it!

Wednesday, September 2, 2009

mugi-kogashi


Last week, while rummaging through the shelves of a wholesaler that caters to owners of small restaurants and izakaya (drinking establishments that also serve meals), I discovered a packet of brown powder that I had never noticed before. The name of the product was Mugi-Kousen. It turns out that mugi-kousen goes by other names depending on the region of Japan. In some regions it is known as hattaiko, and in others mugi-kogashi. They all refer to pulverized roasted barley. A little googling made it clear that this product, which I will call mugi-kogashi (literally "parched barley"), can substitute for kinako (soybean flour) in many recipes, such as the one in the kinako nejiri post. It can also be mixed with cold water for a summertime drink, or with an equivalent amount of sugar for coating mochi. It has a wonderful fragrance, and a rich roasted grain flavor when used in wagashi.

I decided to make a sweet paste out of it-- an alternative to red bean an-- and serve it with dango (rice flour dumplings). The recipe for dumplings is basically the same one I used for shiratama an'mitsu

ingredients:
silken tofu, 400 gr/14 oz
shiratama-ko (glutenous rice flour), 200 gr/7 oz
mugi-kogashi (parched barley flour), approx. 100 gr/3.5 oz
granulated sugar, approx. 100 gr/3.5 oz (adjust for desired sweetness)

Place drained tofu in medium-sized bowl with shiratama flour, and knead together with your fingers till well-blended and soft, but firm. In Japan, the right consistency for dumplings is often described as "the firmness of your earlobes." Keep some shiratama flour in reserve, and add it little by little till you get the right consistency.

Take spoonfuls of the dough and roll them into balls 1 ~ 1&1/2 inch in diameter. Place the balls in a pot of boiling water. Wait a minute or so after the balls rise to the surface, before scooping them out and transferring them to a bowl of very cold or iced water.

Put the roasted barley flour and sugar in a medium-sized bowl. Blend them together with a fork or your fingers. Moisten the dry ingredients by slowly adding water and stirring with a fork or spoon. You want it to become a paste that is stiff enough to allow you to shape it with your hands.

Take a lump of mugi-kogashi paste and flatten it out a bit on the palm of your hand. Place a shiratama ball in the center of the paste, and gently press on the paste till it encloses the ball. Do this till all the balls and paste are used up. Just before serving, you may want to decorate the balls with a sprinkling of crystallized sugar. Any extra shiratama balls or mugi-kogashi paste can be frozen for future use.

Variations: (1) thread some of the shiratama balls on a bamboo skewer or toothpick and spread a bit of the mugi-kogashi paste over the top. (2) Grill some blocks of mochi till they are crispy on the outside and gooey on the inside, and serve mugi-kogashi paste. (3) Follow basic directions for ichigo daifuku, leaving out the strawberry and using the mugi-kogashi paste instead of the red bean an.

For step by step photos click here.